 English
 Espaol
 Franais
 阿拉伯
阿拉伯 中文
中文 Deutsch
 Italiano
 Português
 日本
日本 韓國
韓國 български
 hrvatski
 esky
esky Dansk
Dansk Nederlands
 suomi
suomi Ελληνικ
 印度
印度 norsk
norsk Polski
 Roman
Roman русский
 Svenska
Perkins珀金斯900 3.152柴油發(fā)動(dòng)機(jī)U5PR0002活塞供應(yīng)商,Perkins珀金斯900 3.152柴油發(fā)動(dòng)機(jī)U5PR0002活塞技術(shù)價(jià)格規(guī)格咨詢服務(wù),Perkins珀金斯900 3.152柴油發(fā)動(dòng)機(jī)U5PR0002活塞零配件供應(yīng),Perkins珀金斯900 3.152柴油發(fā)動(dòng)機(jī)U5PR0002活塞售后服務(wù)中心,Perkins珀金斯900 3.152柴油發(fā)動(dòng)機(jī)U5PR0002活塞,Perkins珀金斯900 3.152柴油發(fā)動(dòng)機(jī)U5PR0002活塞詳細(xì)的技術(shù)參數(shù),

首頁
產(chǎn)品展示>Perkins珀金斯900 3.152柴油發(fā)動(dòng)機(jī)U5PR0002活塞
產(chǎn)品中心
美國強(qiáng)鹿柴油機(jī)維修配件技術(shù)中心
約翰迪爾John Deere柴油機(jī)配件 美國麥克福斯
卡特彼勒柴油發(fā)動(dòng)機(jī)參數(shù)
沃爾沃發(fā)動(dòng)機(jī)全系參數(shù)
英國珀金斯原廠配件
珀金斯柴油機(jī)技術(shù)中心
珀金斯發(fā)動(dòng)機(jī)零件查詢圖冊(cè)
日本三菱柴油機(jī)發(fā)電機(jī)配件
德國道依茨 韓國大宇柴油發(fā)動(dòng)機(jī)配件
康明斯全系列柴油發(fā)動(dòng)機(jī)
沃爾沃 MTU 原廠配件銷售中心
瑞典沃爾沃遍達(dá)原裝柴油機(jī)配件
康明斯維修技術(shù)中心
卡特彼勒柴油發(fā)動(dòng)機(jī)原廠配件銷售中心
品牌柴油發(fā)電機(jī)組
康明斯柴油發(fā)動(dòng)機(jī)配件中心
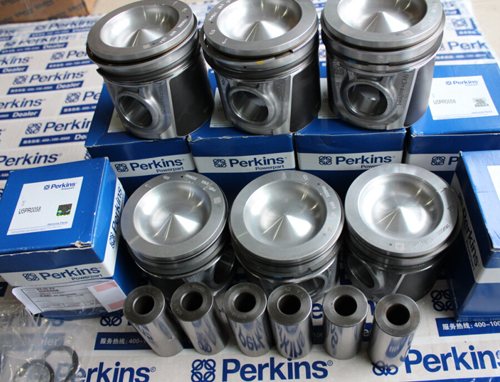
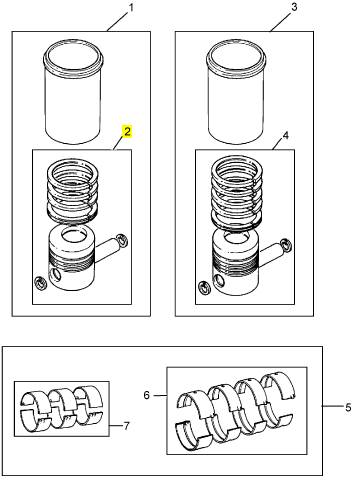
Perkins珀金斯900 3.152柴油發(fā)動(dòng)機(jī)U5PR0002活塞
詳細(xì)描述
項(xiàng)目 零配件號(hào)碼 最新件號(hào) 描述
2 U5PR0002 1 檢查歷史 活塞及圈總成
|
Disassembly and Assembly Section |
|
i02754786 |
|
Engine Oil Pump - Remove |
|
Removal Procedure |
|
NOTICE |
|
Care must be taken to ensure that fluids are contained during performance of inspection, maintenance, test- ing, adjusting and repair of the product. Be prepared to collect the fluid with suitable containers before open- ing any compartment or disassembling any compo- nent containing fluids. |
|
g01385694 |
|
Illustration 66 |
|
Dispose of all fluids according to local regulations and mandates. |
|
NOTICE Keep all parts clean from contaminants. |
|
Contaminants may cause rapid wear and shortened component life. |
|
1. Drain the coolant from the cooling system into a suitable container for storage or for disposal. Refer to Operation and Maintenance Manual, “Cooling System Coolant - Change”. |
|
g01385651 |
|
Illustration 67 |
|
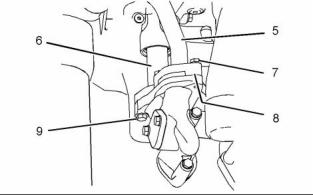
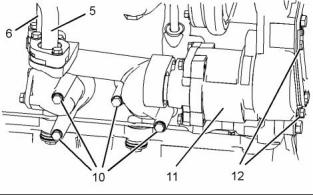
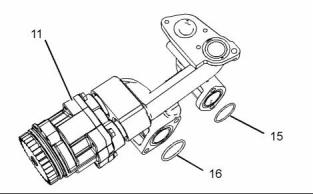
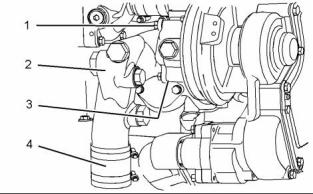
4. Remove bolts (7) and disconnect tube assembly (5) from engine oil pump (11). Remove O-ring seal (8) (not shown) from tube assembly (5). |
|
5. Remove bolts (9) and disconnect tube assembly (6) from engine oil pump (11). |
|
6. Remove bolts (10). |
|
7. Remove bolts (12). |
|
8. Remove engine oil pump (11). |
|
g01385650 |
|
Illustration 65 |
|
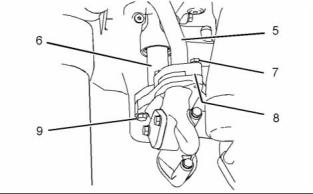
2. Loosen the hose clamps and disconnect hose (4) from connection (2). |
|
3. Remove bolts (1). Remove connection (2) from the water pump. Remove O-ring seal (3) (not shown) from the water pump. |
|
g01386064 |
|
Illustration 68 |
|
This document has been printed from SPI². Not for Resale |
![]()
![]()
![]()
![]()
![]()
![]()

![]()
![]()
![]()
|
KENR6906 |
|
33 Disassembly and Assembly Section |
|
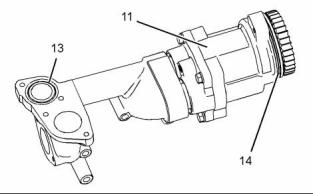
9. Remove O-ring seals (13) and (14) from engine oil pump (11). |
|
g01391548 |
|
Illustration 69 |
|
10. Remove O-ring seals (15) and (16) from engine oil pump (11). |
|
g01395753 |
|
Illustration 70 |
|
i02754790 |
|
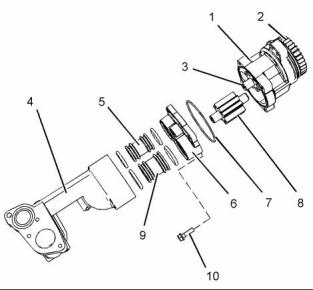
1. Remove manifold (4). |
|
Engine Oil Pump - Disassemble |
|
2. Remove tube assemblies (5) and (9). |
|
3. Remove the O-ring seals from tube assemblies |
|
(5) and (9). |
|
Disassembly Procedure |
|
4. Use Tooling (A) in order to remove gear (2). 5. Remove bolts (10). |
|
Table 15 |
|
Required Tools Part |
|
6. Remove cover (6) from engine oil pump (1). |
|
Tool |
|
Number |
|
Part Description |
|
Qty |
|
A |
|
- |
|
Puller |
|
1 |
|
7. Remove shaft assembly (3) and shaft assembly |
|
(8) from engine oil pump (1). |
|
Start By: |
|
8. Remove oil seal (7). |
|
a. Remove the engine oil pump. Refer to |
|
Disassembly and Assembly, “Engine Oil Pump - Remove”. |
|
i02754791 |
|
Engine Oil Pump - Assemble |
|
Assembly Procedure |
|
Table 16 |
|
Required Tools |
|
Tool |
|
Part Number |
|
Part Description |
|
Qty |
|
POWERPART Rubber Grease |
|
A |
|
21820221 |
|
1 |
|
1. Ensure that all components of the engine oil pump are clean and free from wear or damage. Refer to the Specifications, “Engine Oil Pump” for more information. |
|
This document has been printed from SPI². Not for Resale |
![]()
![]()
![]()
|
34 |
|
KENR6906 |
|
Disassembly and Assembly Section |
|
8. Install new O-ring seals to tube assemblies (5) and (9). Lubricate the O-ring seals with Tooling (A). |
|
9. Install tube assemblies (5) and (9) to cover (6). |
|
10. Install manifold (4) onto tube assemblies (5) and (9). |
|
End By: |
|
a. Install the engine oil pump. Refer to Disassembly and Assembly, “Engine Oil Pump - Install”. |
|
i02754792 |
|
Engine Oil Pump - Install |
|
Installation Procedure |
|
g01395753 |
|
Illustration 71 |
|
Table 17 |
|
Required Tools |
|
Tool |
|
Part Number |
|
Part Description |
|
Qty |
|
POWERPART Rubber Grease |
|
A |
|
218200221 |
|
1 |
|
NOTICE Keep all parts clean from contaminants. |
|
Contaminants may cause rapid wear and shortened component life. |
|
g01146945 |
|
Illustration 72 |
|
2. Lubricate shaft assemblies (3) and (8) with clean engine oil. Install the shaft assemblies into engine oil pump (1). |
|
3. Install a new oil seal (7) to engine oil pump (1). |
|
4. Position cover (6) onto engine oil pump (1) and install bolts (10). |
|
5. Tighten bolts (10) to a torque of 28 N·m (21 lb ft). |
|
g01391548 |
|
Illustration 73 |
|
Always wear protective gloves when handling parts that have been heated. |
|
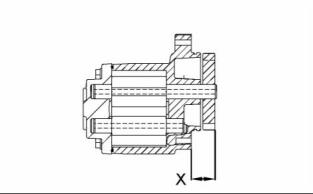
6. Heat gear (2) to a temperature of 316 °C (600 °F). |
|
7. Install gear (2) to shaft assembly (3). Ensure that Dimension (X) is 29.40 ± 0.50 mm (1.158 ± 0.020 inch). |
|
This document has been printed from SPI². Not for Resale |
![]()
![]()

![]()
![]()
![]()

![]()
![]()
![]()
|
KENR6906 |
|
35 Disassembly and Assembly Section |
|
6. Install new O-ring seal (8) (not shown) to tube assembly (5). Connect the tube assembly to engine oil pump (11) and install bolts (7). |
|
7. Tighten bolts (7) and bolt (9) to a torque of 28 N·m (21 lb ft). |
|
g01386064 |
|
Illustration 74 |
|
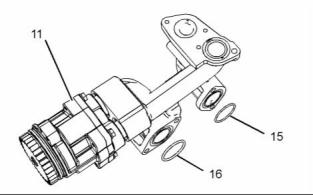
1. Install new O-ring seal (14) to engine oil pump (11). Lubricate the O-ring seal with Tooling (A). |
|
2. Install new O-ring seals (13), (15) and (16) to |
|
engine oil pump (11). |
|
g01385650 |
|
Illustration 77 |
|
8. Install a new O-ring seal (3) (not shown) to the water pump. position connection (2) and install bolts (1). Tighten the bolts to a torque of 28 N·m (21 lb ft). |
|
9. Connect hose (4) to connection (2). Tighten the hose clamps securely. |
|
10. Fill the cooling system. Refer to Operation and Maintenance Manual, “Cooling System Coolant - Change”. |
|
i02754793 |
|
g01385651 |
|
Illustration 75 |
|
Water Pump - Remove |
|
Removal Procedure |
|
Start By: |
|
a. Remove the front plate and the support bracket. Refer to Disassembly and Assembly, “Front Plate - Remove” |
|
NOTICE Keep all parts clean from contaminants. |
|
g01385694 |
|
Illustration 76 |
|
Contaminants may cause rapid wear and shortened component life. |
|
3. Position engine oil pump (11) and install bolts (12) finger tight. |
|
4. Install bolts (10). Tighten bolts (10) and (12) to a torque of 28 N·m (21 lb ft). |
|
5. Connect tube assembly (6) to engine oil pump (11) and install bolts (9). |
|
This document has been printed from SPI². Not for Resale |
![]()
![]()

![]()

![]()
![]()
![]()
![]()